Cool...well I guess you decided to check it out. I'm going to go a little fast here but you should be able to follow along.
The first thing to do is decide what images you are going to "stitch" together. You can stitch 2 images using the stitch feature. We will add the third image useing the SELECTION tool.
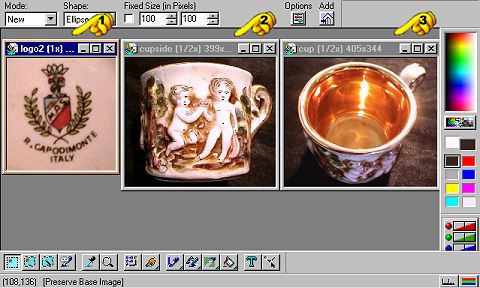
First I opened all three images into the editing window. The two cup pictures are going to be stitched together. If you stitch images side by side it will look best if they are both the same height. And if you stitch top to bottom they should be the same width. Always resize the bigger one smaller. A reduced image looks better than an enlarged one. I resized the image called cupside (#2) a little smaller to match the height of the image called cup (#3). Since we won't be using the image called logo2 (#1) for now you must minimize it. Click on the flat line box in the upper right corner of the image to minimize it.
Click on the image that is going to be on the left or top of the stitched image, the header should highlight when it is clicked on. I want the cupside image on the left because the dark color on the right of the image will blend well with the dark color on the left of the cup image. You won't even be able to tell they have been stitched together.
Click on EDIT then STITCH.
#1 Leave transparency at 50%. This blends the overlapped area making the stitch even less visible. Play around with the setting and you will figure it out.
#2 Check the MANUALLY box.
#3 Uncheck the AUTO FINE TUNE if it is checked.
#4 Here is where you can choose to stich side by side or top to bottom. Note that the little box outlined in blue is on the left or top. That is the selected image, the one you clicked on back in the editing widow.
#5 If you click on this button it will display the images "fitted" into the stitch editing window.
Place the cursor over the right or left image and drag it over until you have it where you want it. I have already done that in this example. Click on OK when you are ready.
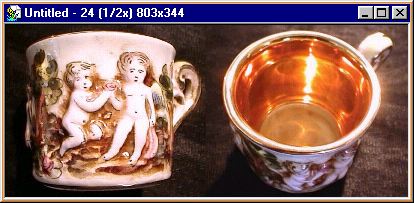
Here is the newly "stitched" image. Looks pretty good huh? Note the info in the header of the image. It is pretty wide now, 803 pixels wide. That is too wide for easy viewing in an auction but leave that alone for the moment. Now, we are going to add the third image, the logo. This we will do using the STANDARD SELECTION tool.

Click on the button that is a blue square with a little arrow in the corner on the tool bar. This is the STANDARD SELECTION tool.

Find the ATTRIBUTES box and click on the OPTIONS button and make sure ANTI-ALIASING is checked and if you want to preserve the base (original) image, check that one. The DRAW FROM CENTER can be checked or unchecked. It just depends on however you find it easer to use. I unchecked it. The MOVE SELECTION MARQUEE can be checked also. Choose ELLIPSE in the SHAPE box amd NEW in the MODE box and uncheck the little box between SHAPE and FIXED SIZE boxes if it is checked.
 Now I position the cursor in the upper right corner of the logo image, a little above the logo and a little to the right of it. Holding down the left mouse button I move the cursor down and to the left until the ellipse shape has outlined all of the parts of the image I want to paste into the stitched image, like in the picture to the right. It might take you a few practice tries to get the hang of it.
Now, while the logo image is still the "active" image, you can tell because the header is highlighted, click on EDIT then COPY. Now click on the stitched image to make it the active image. Then click on EDIT then PASTE then either UNDER POINTER or AS AN OBJECT. Now drag the pasted image to where you want it in the stitched image. I'm going to place it between the cups. I should mention that I had previously tested the logo image and found I had to resize it smaller to make it fit correctly into the stitched image. You will have to determine that for your images if you decide to try something like this.

Here is the finished image in it's actual size. Remember that it was pretty wide after stitching, 803 pixels wide by 344 pixels high. I resized it to 450 pixels wide and the height automatically adjusted to 194. 500 pixels wide is the upper limit I recommend for eBay auctions. But you have to be the ultimate judge of your own images.